Monday, September 25, 2006

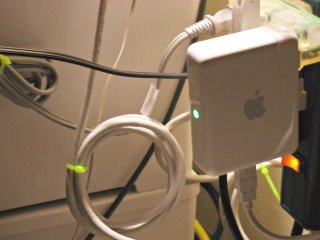
Airport Express Printer Setup


After a visit to the Apple Store, it turns out that the reason the new HP PhotoSmart 3180 did not work with Airport Express out of the box is due to HP driver. At the genius bar the guy did not use the manufacture's installation disk but instead used the GIMP driver that comes with OSX and the wireless printing worked in minutes. The genius bar closes at 6pm on Sunday, I walked in at 5:48pm and walked out of the store at 5:59pm.

Now that it works fine with OSX and XP, I start to think maybe it works with Linux as well. Tried it in Fedora Core 4:

Select "Networked JetDirect" printer queue type when adding new computer using the printer utility in Fedora Core 4. When promted to fill in the printer and port, I use the IP of the printer (10.0.1.8) for "printer" field and leave the port as default (9100). There is no HP PhotoSmart 3100 series in the driver list provided by Fedora Core 4, I tried PhotoSmart p1100 which is close to the GIMP driver used by the genius at Apple store. The printer did print, but the page is distorted. So I went back to the HP driver list and selected PhotoSmart 2600 which is the closest to 3180 in the list. This time it works fine (so far).

Thursday, September 21, 2006

Richard Hammond In Critical Serious Condition


TV host seriously hurt in crash
Richard Hammond
The presenter is being treated at Leeds General Infirmary

Top Gear's Richard Hammond is seriously ill in hospital after a crash in a jet-powered car while filming for the BBC programme.

The 36-year-old presenter was taken by air ambulance to Leeds General Infirmary's neurological unit.

A spokesman for the hospital said Mr Hammond was "stable".

Mr Hammond had been driving a dragster-style car capable of reaching speeds of up to 300mph at the former RAF airfield in Elvington, near York.

The crash will be investigated by the Health and Safety Executive and the BBC.


Thursday, September 14, 2006

ThinkPad Fixed


I have to say it is pretty good.

From the day I called the service center to the day I received the fixed machine, only 10 days. This includes Labour Day holiday, 2-way transpotation (DHL overnight covered by IBM), and a re-deliver because I was not at home at the first delivery attempt (I wasn't expecting it to show up so quickly).

So all things considered, it is not too bad. 2-year old machine gets fixed rapidly at no cost with no questions asked. The only compariable experience was with Apple. The iBook got a few recalls and services, all at zero cost with a fast turnaroud (desk to desk) time of about a week.

Sharing Printer From Ubuntu

server:
Ubuntu 6.06, HP Deskjet 3820 connected via USB

client:
Fedora Core 4 on IBM T41(OK)
WinXP on IBM T41(OK)
OSX 10.2.8 on iBook G3(not working)

I found this article:
https://help.ubuntu.com/community/NetworkPrintingFromWinXP
which describes the setup for Ubuntu server and WinXP client. Again, fear of losing the actual online article, I c/p the actual content here:

NetworkPrintingFromWinXP

By following these steps, you will be able to share a printer from
your Ubuntu computer so that Windows XP and Windows 2000
computers can print to it. This document has been tested with
Ubuntu versions 5.10 and 6.06.

1) Install the printer on the Ubuntu computer
2) Open a terminal.
3) Modify /etc/cups/cupsd.conf with your favourite editor, for example

sudo gedit /etc/cups/cupsd.conf
or sudo nano -w /etc/cups/cupsd.conf

4) In this file, edit the first tag to allow connections from your network.
Assuming that your network use adresses starting with "192.168.0."
you add the following: (you only need to modify the top level (first)
Location tag because other Location tags seem to inherit permissions)

Order Deny,Allow
Deny From All
Allow From 127.0.0.1
#Modify 192.168.0.* to match your configuration.
Allow From 192.168.0.* NOTE: I used 10.0.1.*

Also set which TCP port that the printer system will accept connections
on. In Ubuntu 5.10 (Breezy) add this line under the Network Options
part of the file (somewhere around line 420), or in Ubuntu 6.06 (Dapper)
add the following line to /etc/cups/cups.d/ports.conf:

 Port 631

and comment out:

 Listen 127.0.0.1:631    NOTE: mine is localhost:631, also comment this out

5) Save the file and exit the editor. Now restart the printing system with
this command:

sudo /etc/init.d/cupsys restart

6) Now add the printer to the Windows computer by using the Windows
"Add Printer" Wizard. Type in the following in the printer URL:

http://192.168.0.100:631/printers/Deskjet-940C
NOTE: mine is http://10.0.1.3:631/printers/Deskjet-3820

Replace "192.168.0.100" with the IP adress of the Ubuntu box. Replace
"Deskjet-940C" with your printer's name.

If you add this entry to C:\WINDOWS\system32\drivers\etc\hosts
NOTE: didn't do this

192.168.0.100   printer-server

replacing "192.168.0.100" with the IP adress of the Ubuntu box, then
you can use a URL like

http://printer-server:631/printers/Deskjet-940C

You should use the appropriate Windows printer driver for your printer. CategoryDocumentation

last edited 2006-07-22 20:33:00 by Mawds

NOTE:

Fedora Core 4 client setup:


When adding new printer, select IPP, fill in IP address 10.0.1.3 and printer queue printers/Deskjet-3820, system defaults port to 631 so ipp://10.0.1.3:631/printers/Deskjet-3820 is automatically generated. Everything works fine. Fedora Core has HP Deskjet 3820 driver.

WinXP client setup:

As described in the original article.

OSX 10.2.8:

Does not work. Setup is very similar to Fedora Core 4, but after adding printer and try to print, it takes forever to connect to server and never prints. Do not know if this is a 10.2.8 issue or extra server setup is needed. I try to avoid using Samba.

Monday, September 11, 2006

NFS Client Setup on OSX

Now that the old iBook is back to life and my T41 is being repaired, I need to get NFS working from the iBook.

Since I already had it working from Fedora Core 4 on T41, I figured that it should not be difficult to get it right on OSX.

First, add the IP of iBook to server side, modifiying the following files:

/etc/exports
/etc/hosts.allow


Client side:

I found this nice writeup someone did at:
http://mactechnotes.blogspot.com/2005/08/mac-os-x-as-nfs-client_31.html

Again, to avoid loosing the content of the link, I c/p the actualy post below:

Note: it seems that I do need the -P option for the NFS mount to work. From my server side firewall, I can see that a port lower than 1024 is needed for NFS. Also my previous attempts by directly using mount from command line had silently failed with an empty link, it looks like I do need the -P option. This is the only option I used.

Mac OS X as an NFS Client

Overview
I'll discuss the changes necessary to mount NFS filesystems onto a Mac OS X machine. This was originally written in the 10.1 days, but is still applicable on 10.4.2 (non-server versions tested).

The example filesystem used here will be called /exported/path from the server nfsserver. It will be mounted to /private/mnt. You will obviously want to change these to something useful and sane for your situation.

Mounting NFS filesystems on OS X can be done simply by running:

sudo mount nfsserver:/exported/path /private/mnt

This is, however, temporary (it won't live through a reboot). In order to have the system deal with mounting it for you, you could add that mount command to an rc script or create a startup script in /Library/StartupItems. The best way, however, is to add the information to NetInfo, and let the automounter handle everything.

In a nutshell, a new directory is added to NetInfo, called /mounts, and subdirectories under that specify the remote filesystems to mount.


NetInfo Changes, Graphical-Style

  1. To accomplish this in Aqua, run NetInfo Manager (located in /Applications/Utilities) and authenticate as an administrator (the little lock at the bottom of the window).
    Authenticate lock
    Authenticate lock


  2. We need to create a new directory, so click on the left-most directory (called simply, /), and create a new directory (through the button, menu option, or shortcut Cmd-N).
    This will create a new directory called new_directory, which we need to rename.
    root in the directory browser
    root in the directory browser

    Ways to create a directory
    Ways to create a directory


  3. In the bottom part of the window, double-click on new_directory in the Value(s) column, which will highlight new_directory and place the insertion point there. Simply type mounts to rename it then save changes (Cmd-S or Domain menu, and select Save) to update the browser portion of the window.
    Renaming the newly-created directory
    Renaming the newly-created directory

    Now renamed, but not saved
    Now renamed, but not saved

    Now renamed and saved
    Now renamed and saved

    Any mounts the automounter handles will be listed under this new directory in NetInfo. Let's add one.


  4. Click on mounts in the browser, and create a new directory. The value of the name property for each subdirectory in mounts specifies the remote filesystem to be mounted (in our example, nfsserver:/exported/path). Double-click new_directory in Value(s), and enter nfsserver:/exported/path. This specifies what remote filesystem to mount, but nothing else; we need to add a few more properties in this directory.


  5. Under the Directory menu is a command, New Property, which is what we will use to add the properties. Select this command three times, as we'll be specifying the local mount point, mount options, and the mount type.
    Three new properties added
    Three new properties added


  6. Double-click the first new_property and rename it to type; set the value of this property to nfs since we're doing NFS. Change the second new_property to opts, and set the value to a blank (delete what is currently there, also see the note about opts at the end, especially if you experience problems). Change the third new_property to dir and set its value to /private/mnt.
    Properties are now set
    Properties are now set


  7. Save changes. At this point, all necessary information has been loaded into NetInfo for automount to take care of the NFS mount. The only thing left is to inform the automount process that things have changed.


This can, of course, be repeated for other NFS mounts. Run through the steps for each one, then do the final step (notifying automount) after all the mounts have been entered.

NetInfo Changes, Command Line
Adding an NFS mount point via the command line is actually quite simple, once you know the secret. It involves four simple steps, one to create the new NetInfo entry, and three to add the three new properties to that

  1. To create the new entry, run

    sudo nicl . -create /mounts/nfsserver:\\/exported\\/path

    Since NetInfo uses the / to separate path components, and we have / characters in the entry we want to create, they have to be escaped.
    This is done with the backslash, \, and since we are running in a shell, we need to double them up. After the shell is done examining the command, the string \\/ becomes \/ which is what we need to pass to nicl. If we don't use any backslashes, nicl will end up creating an entry /mounts/nfsserver: which has a subdirectory exported and that would have a subdirectory path. This is definitely not what we want.
    Basically, double-backslash the forward slashes in the NFS server's path (/exported/path), but not the NetInfo path (/mounts/).


  2. Now we need to add the three properties which tell automount about this entry. We need type which we set to nfs; opts, set to an empty string (but see the note about opts, below, if you have problems); and dir, set to the local mount point, /private/mnt. This is done:

    sudo nicl . -append /mounts/nfsserver:\\/exported\\/path type nfs
    sudo nicl . -append /mounts/nfsserver:\\/exported\\/path opts ""
    sudo nicl . -append /mounts/nfsserver:\\/exported\\/path dir /private/mnt

    The interesting thing to note is /private/mnt doesn't have any escaped forward slashes. This is due to the data being given to nicl in this case is a value, not a NetInfo path, so we needn't do any escaping this time. These commands simply append the given property to our newly-created NFS entry, and give those properties appropriate values.


  3. The last step is to notify automount that there are changes.


As with the graphical version, this can be repeated for all necessary NFS mounts you need to have on your OS X machine. Add them all, then notify automount.

Final Step: Tell automount
The automount process now needs to be told that new information is available for it to use. You can either simply reboot, or run the following in Terminal:

sudo kill -1 `cat /var/run/automount.pid`

This will send a HUP signal to the automount process; note those are backticks, not the normal single quote marks. A HUP causes automount to unmount anything not busy, reread configuration, and start anew.

A Few Notes to Know

  • Local mount point, availability
    The first thing to note is the local mount point (once automount takes it) becomes a symlink. It should point to /automount/private/mnt, as that's where automount puts all of its mount points. Then, when the symlink is accessed, automount will live up to its name by automatically mounting the proper NFS server's filesystem. This is one reason why using automount is better than a static mount in some startup script: if the NFS server is down, it won't matter until you try to access the mount; with a static mount, booting up the client will take several minutes while it times out waiting for the down server.


  • opts
    The other thing to note is, if your NFS server requires a client to be coming from a privileged network port (less than 1024), you will need to add -P to the opts property, instead of the empty string. You can also modify the server to allow 'insecure' ports, but using -P doesn't require root access to the server.
    This will be the case with certain BSD-based servers and some Linux ones as well. If the local mount point becomes a symlink (as discussed above), but doesn't have any of the files expected from the server, try adding the -P option, then tell automount. If the mount still doesn't work, there are other issues to deal with (a full NFS troubleshooting discussion is beyond the scope of this document).


  • Viewing /mounts from the command line
    If you want to look at what's currently in /mounts from the command line, run

    nidump -r /mounts .

    This will dump out the information recursively (what's in /mounts, and all the information pertaining to it). It should look something like

    {
    "name" = ( "mounts" );
    CHILDREN = (
    {
    "dir" = ( "/private/mnt" );
    "name" = ( "nfsserver:/exported/path" );
    "type" = ( "nfs" );
    "opts" = ( "" );
    }
    )
    }


Friday, September 08, 2006

All It Takes to Rescue an iBook


Is a vacation.

A few weeks after the hard drive on the 5-year old G3 iBook gave up, I plugged it in and powered it on. It works, again. Time to move data to server before something bad happens ...

Sunday, September 03, 2006

Got Tree?

ATI Graphics Card Problem


Today, September 3rd 2006, the ATI Mobility Radeon graphics card finally gave up and I have no display.

There was a hint of problem a few months ago, when I connected the T41 to the TV set using S-video, while the display on the TV screen was OK, the display on the laptop LCD was fuzzy: it was shaking in the horizontal direction and it was very hard to follow the mouse pointer on the screen.

This time, however, it is even worse.

It started as the previous time: screen started to oscillate in the horizontal direction with everything still visible. But when I tried to move the cursor trying to close applications before reboot, I realized that the screen was not responding: nothing was moving on the screen even if I moved the mouse and tried to type on the keyboard. I was not sure if the system was still running, but I had to use the power button to shut it down.

Then I tried to boot the machine again, and the bad news came - there was nothing on the screen. The LCD was dead black, not in black color, but in sorry-there-is-no-video-signal black. I had no idea what state the OS was in, and had no choice but to reach for the power button again.

Called IBM ThinkPad support line, it is 10pm Pacific time and the center in Atlanta is still working. After maybe 5 minutes of waiting, a service rep answered and I was shocked to realize that my 2004 T41 is still in warranty (might have saved couple of hundred $$). They will send me a box in which I will mail the machine to their service center for diagnostics and repair. At this point, it does not seem as bad as I had expected considering this laptop is my main machine (the backup machine is a 5-year-old AMD 900MHz, mentioned in a previous post). Since it is more expensive than my car I am not (able to) going to replace it any time soon. Fortunately I just did a major overhaul on the old AMD box and backed up data onto that machine, there should not be serious data loss even if IBM decides that I need new harddrive which is unlikely to happen - I was told by the support rep to keep my harddrive when mailing the machine to IBM. Looks like they won't know I am running Fedora Core 4 along with the original XP. This should not be the cause of graphics card failure, because I have been running this dual-boot setup for over 2 years.

Friday, September 01, 2006

Activate Fedora WiFi on Startup

For a while I have to use system-config-network to manually enable WiFi after each startup for Fedora. This is not only tedious, but keeps me from running netowrk-related stuff automatically on startup.

I searched around and found a post saying the following:
check if you have the file:
/etc/sysconfig/network-scripts/ifcfg-wlan0

If you don't, create it as follows:

DEVICE=wlan
BOOTPROTO=dhcp
ONBOOT=yes
ESSID=linksys

and try:
service network restart.

You might need to add some more parameters to /ifcfg-wlan0 for it to work, you can look them up in /etc/sysconfig/network-scripts/ifup-wire
less.
I looked at my system and there is a similar file:
/etc/sysconfig/network-scripts/ifcfg-dev12174
It is the one related to my current wireless setup. As I remember every time I use system-config-network to manually activate WiFi, dev12174 is the one.

I saved the original file and edited the content by changing the following line:
ONBOOT=yes
After reboot, WiFi is automatically activated :)

The new /etc/sysconfig/network-scripts/ifcfg-dev12174 file looks like:
# Please read /usr/share/doc/initscripts-*/sysconfig.txt
# for the documentation of these parameters.
IPV6INIT=no
ONBOOT=yes
USERCTL=no
PEERDNS=yes
GATEWAY=
TYPE=Wireless
DEVICE=dev0
HWADDR=hh:hh:hh:hh:hh:hh
BOOTPROTO=dhcp
NETMASK=
DHCP_HOSTNAME=
IPADDR=
DOMAIN=
ESSID=
CHANNEL=6
MODE=Auto
RATE='11 Mb/s'

I also came acroos this suggestion below. I did not use it though:
make a new file 'wifi' in your /etc/init.d directory (chmod 755 it) and edit it:

#!/bin/sh
case "$1" in
start)
echo -n "Starting WIFI Network"
iwconfig wlan0 essid "linksys"
dhclient wlan0
echo "."
;;
stop)
echo -n "Stopping WIFI Network"
ifdown wlan0
echo "."
;;
restart)
echo -n "Restarting WIFI Network"
ifdown wlan0
iwconfig wlan0 essid "linksys"
dhclient wlan0
echo "."
;;
*)
echo "Usage: /etc/init.d/wifi {start|stop|restart}"
exit 1
;;
esac

exit 0

then, make a link to this file in the appropriate runlevel directory to get it started (let's put in in runlevel2, this is the first multiuser runleve)
ln -s /etc/init.d/wifi /etc/rc2.d/SS15wifi

this should do.
if you have to restart your wifi for some reason, you can type: /etc/init.d/wifi restart