Monday, December 04, 2006

Scanning ...

40M a picture, loud and clear ...

It's filling up my hard drive quickly.

Tuesday, November 28, 2006

Thanksgiving Trip

During the Thanksgiving holiday of 2006, we went on a journey from Silicon Valley to the Death Valley, the city of Las Vegas, and turned around after a visit to the Hoover Dam on the border of Nevada and Arizona. The entire trip took 3 days and covered a distance of about 1200 miles (1900 kilometers). It is our longest road trip so far.

Day 1: Mountain View to Ridgecrest, 350 miles
Day 2: Ridgecrest, Death Valley, Middle of Nowhere, Vegas, 280 miles
Day 3: Bolder City, Hoover Dam, Barstow, Mountain View, 600 miles

Saturday, November 18, 2006

Close Call

After an unsuccessful attempt to get /etc/acpi/action/sleep.sh to work (properly), the hard drive froze up after the lid was opened after closing. Even reboot could not help, a hard disk volume error was found and self-correction failed. System entered read-only mode, requring root privilige.

I was scared. Having poked around as root for some minor system setups and installations, I NEVER did anything related to system recovery.

I had 2 choices:

1) install FC6, it's about time to upgrade from FC4 anyway, but doing so I will lose all my data on the corrent FC4, including some project data (code) and all the network configurations I just finished.

2) try to fix the currupted file system, even though I have no clue.

Realising that failing to do (2) would still allow me to do (1) as a last resort, I held my breath and marched on. Having absolutely no idea what I was doing, I logged in as root and followed the instructions given by the system, word by word as I went alone. I turned out that it was mostly some (about 200) inodes were messed up and I was fixing them with the help of the system. And then, after reboot, it worked :)

System fully recovered and running without a problem.

Saturday, November 11, 2006

Sunday, November 05, 2006

Saturday, November 04, 2006

Teeth


A week ago, I felt some scratching of my mouth against my teeth in the upper back. Turns out they are the wisdom teeth, and there are a few cracks on them. Doctor suggested surgical extraction.

So here I am today at the dentist's clinic. Ready to have 2 of my wisdom teeth taken out. I was told not to eat or drink anything at all 8 hours prior to the surgery. I did not understand why. It turns out that it is because they do not want me to throw up in the middle of the procedure because the anesthesia might cause vomiting. I did not want that to happen anyway. So some starving is rightfully necessary.

I was given general anesthesia through a needle in my right arm. 15 seconds after the doctor put in the drug, I did not know anything, I did not even know that I passed out. When I woke up, it seems that nothing ever happened ... First thing I thought of after waking up, was that some of the stuff in Hollywood movies might be true ... This is much better than my last encounter with anesthesia, when it did not kick in until 3 hours after the whole thing was over ...

Anyway, I was then transferred from the surgery room to a regular room. I walked all the way there, did not feel any dizziness or disoriented except that my eyes are kind of reluctant to focus so I cannot see very far. I probably looked weird with my left eyeball out of synch with the right one 8-). I envisioned a lap around Thunerhill just to make sure nothing is wrong with my head.

Then the nurse called in my wife and let us watch a video together about things to be aware of after the surgery. However, the computer crashed.

We eventually left the clinic after watch the video. I was feeling ok. Probably the doctor injected some pain killer into my teeth area because I am not feeling any pain at all even though I am now completely awake.

Now it just the beginning. The days after the surgery is supposed to be worse than the extraction itself. I cannot eat solid food for a few days (I've been eating a lot recently just in case). And there is expected to be some pain but I've already told my boss that I might have to take a day or two off.

Wait and see.

Loser Wins 2006 MotoGP


That's life. Rules are rules.

Monday, October 30, 2006

Failed to Put T41 into Sleep on FC4

Sort of. It goes to sleep after the lid is closed, but wakes up with a crazy hard drive.

Sunday, October 29, 2006

Procrastination

The Government Thinks I Am Underpaid

According to the letter I received in the mail from the US Department of Labor, I should have a 25.9% salary increase, in order to bring my wage up to the local average.

Do you hear it, HR?

Wednesday, October 18, 2006

Who The F*&% Wrote the Screenplay?!

Ever since Zhang-Yimou thought he could write a story and get funding for Zhang-Ziyi to get half naked, Chinses directors and producers have been f*&%ing themselves. The emergence of CGI and big money made the transition of Chinses theater from pure propaganda to expensive shit in 3 minutes.

(to be continued)

Monday, October 16, 2006

Wife is using sudo

Wife is using sudo command from command line, guided by some forum posts in the attempt to fix the (lost of) sleep problem in MacBook power management.

Traffic School

Had to go to traffic school on Saturday taught by a part-time comedian in the executive room in the cafe of a golf course next to a flying club based on the local airfield.

Case dismissed.

Saturday, October 07, 2006

Monday, September 25, 2006

Airport Express Printer Setup


After a visit to the Apple Store, it turns out that the reason the new HP PhotoSmart 3180 did not work with Airport Express out of the box is due to HP driver. At the genius bar the guy did not use the manufacture's installation disk but instead used the GIMP driver that comes with OSX and the wireless printing worked in minutes. The genius bar closes at 6pm on Sunday, I walked in at 5:48pm and walked out of the store at 5:59pm.

Now that it works fine with OSX and XP, I start to think maybe it works with Linux as well. Tried it in Fedora Core 4:

Select "Networked JetDirect" printer queue type when adding new computer using the printer utility in Fedora Core 4. When promted to fill in the printer and port, I use the IP of the printer (10.0.1.8) for "printer" field and leave the port as default (9100). There is no HP PhotoSmart 3100 series in the driver list provided by Fedora Core 4, I tried PhotoSmart p1100 which is close to the GIMP driver used by the genius at Apple store. The printer did print, but the page is distorted. So I went back to the HP driver list and selected PhotoSmart 2600 which is the closest to 3180 in the list. This time it works fine (so far).

Thursday, September 21, 2006

Richard Hammond In Critical Serious Condition


TV host seriously hurt in crash
Richard Hammond
The presenter is being treated at Leeds General Infirmary

Top Gear's Richard Hammond is seriously ill in hospital after a crash in a jet-powered car while filming for the BBC programme.

The 36-year-old presenter was taken by air ambulance to Leeds General Infirmary's neurological unit.

A spokesman for the hospital said Mr Hammond was "stable".

Mr Hammond had been driving a dragster-style car capable of reaching speeds of up to 300mph at the former RAF airfield in Elvington, near York.

The crash will be investigated by the Health and Safety Executive and the BBC.


Thursday, September 14, 2006

ThinkPad Fixed


I have to say it is pretty good.

From the day I called the service center to the day I received the fixed machine, only 10 days. This includes Labour Day holiday, 2-way transpotation (DHL overnight covered by IBM), and a re-deliver because I was not at home at the first delivery attempt (I wasn't expecting it to show up so quickly).

So all things considered, it is not too bad. 2-year old machine gets fixed rapidly at no cost with no questions asked. The only compariable experience was with Apple. The iBook got a few recalls and services, all at zero cost with a fast turnaroud (desk to desk) time of about a week.

Sharing Printer From Ubuntu

server:
Ubuntu 6.06, HP Deskjet 3820 connected via USB

client:
Fedora Core 4 on IBM T41(OK)
WinXP on IBM T41(OK)
OSX 10.2.8 on iBook G3(not working)

I found this article:
https://help.ubuntu.com/community/NetworkPrintingFromWinXP
which describes the setup for Ubuntu server and WinXP client. Again, fear of losing the actual online article, I c/p the actual content here:

NetworkPrintingFromWinXP

By following these steps, you will be able to share a printer from
your Ubuntu computer so that Windows XP and Windows 2000
computers can print to it. This document has been tested with
Ubuntu versions 5.10 and 6.06.

1) Install the printer on the Ubuntu computer
2) Open a terminal.
3) Modify /etc/cups/cupsd.conf with your favourite editor, for example

sudo gedit /etc/cups/cupsd.conf
or sudo nano -w /etc/cups/cupsd.conf

4) In this file, edit the first tag to allow connections from your network.
Assuming that your network use adresses starting with "192.168.0."
you add the following: (you only need to modify the top level (first)
Location tag because other Location tags seem to inherit permissions)

Order Deny,Allow
Deny From All
Allow From 127.0.0.1
#Modify 192.168.0.* to match your configuration.
Allow From 192.168.0.* NOTE: I used 10.0.1.*

Also set which TCP port that the printer system will accept connections
on. In Ubuntu 5.10 (Breezy) add this line under the Network Options
part of the file (somewhere around line 420), or in Ubuntu 6.06 (Dapper)
add the following line to /etc/cups/cups.d/ports.conf:

 Port 631

and comment out:

 Listen 127.0.0.1:631    NOTE: mine is localhost:631, also comment this out

5) Save the file and exit the editor. Now restart the printing system with
this command:

sudo /etc/init.d/cupsys restart

6) Now add the printer to the Windows computer by using the Windows
"Add Printer" Wizard. Type in the following in the printer URL:

http://192.168.0.100:631/printers/Deskjet-940C
NOTE: mine is http://10.0.1.3:631/printers/Deskjet-3820

Replace "192.168.0.100" with the IP adress of the Ubuntu box. Replace
"Deskjet-940C" with your printer's name.

If you add this entry to C:\WINDOWS\system32\drivers\etc\hosts
NOTE: didn't do this

192.168.0.100   printer-server

replacing "192.168.0.100" with the IP adress of the Ubuntu box, then
you can use a URL like

http://printer-server:631/printers/Deskjet-940C

You should use the appropriate Windows printer driver for your printer. CategoryDocumentation

last edited 2006-07-22 20:33:00 by Mawds

NOTE:

Fedora Core 4 client setup:


When adding new printer, select IPP, fill in IP address 10.0.1.3 and printer queue printers/Deskjet-3820, system defaults port to 631 so ipp://10.0.1.3:631/printers/Deskjet-3820 is automatically generated. Everything works fine. Fedora Core has HP Deskjet 3820 driver.

WinXP client setup:

As described in the original article.

OSX 10.2.8:

Does not work. Setup is very similar to Fedora Core 4, but after adding printer and try to print, it takes forever to connect to server and never prints. Do not know if this is a 10.2.8 issue or extra server setup is needed. I try to avoid using Samba.

Monday, September 11, 2006

NFS Client Setup on OSX

Now that the old iBook is back to life and my T41 is being repaired, I need to get NFS working from the iBook.

Since I already had it working from Fedora Core 4 on T41, I figured that it should not be difficult to get it right on OSX.

First, add the IP of iBook to server side, modifiying the following files:

/etc/exports
/etc/hosts.allow


Client side:

I found this nice writeup someone did at:
http://mactechnotes.blogspot.com/2005/08/mac-os-x-as-nfs-client_31.html

Again, to avoid loosing the content of the link, I c/p the actualy post below:

Note: it seems that I do need the -P option for the NFS mount to work. From my server side firewall, I can see that a port lower than 1024 is needed for NFS. Also my previous attempts by directly using mount from command line had silently failed with an empty link, it looks like I do need the -P option. This is the only option I used.

Mac OS X as an NFS Client

Overview
I'll discuss the changes necessary to mount NFS filesystems onto a Mac OS X machine. This was originally written in the 10.1 days, but is still applicable on 10.4.2 (non-server versions tested).

The example filesystem used here will be called /exported/path from the server nfsserver. It will be mounted to /private/mnt. You will obviously want to change these to something useful and sane for your situation.

Mounting NFS filesystems on OS X can be done simply by running:

sudo mount nfsserver:/exported/path /private/mnt

This is, however, temporary (it won't live through a reboot). In order to have the system deal with mounting it for you, you could add that mount command to an rc script or create a startup script in /Library/StartupItems. The best way, however, is to add the information to NetInfo, and let the automounter handle everything.

In a nutshell, a new directory is added to NetInfo, called /mounts, and subdirectories under that specify the remote filesystems to mount.


NetInfo Changes, Graphical-Style

  1. To accomplish this in Aqua, run NetInfo Manager (located in /Applications/Utilities) and authenticate as an administrator (the little lock at the bottom of the window).
    Authenticate lock
    Authenticate lock


  2. We need to create a new directory, so click on the left-most directory (called simply, /), and create a new directory (through the button, menu option, or shortcut Cmd-N).
    This will create a new directory called new_directory, which we need to rename.
    root in the directory browser
    root in the directory browser

    Ways to create a directory
    Ways to create a directory


  3. In the bottom part of the window, double-click on new_directory in the Value(s) column, which will highlight new_directory and place the insertion point there. Simply type mounts to rename it then save changes (Cmd-S or Domain menu, and select Save) to update the browser portion of the window.
    Renaming the newly-created directory
    Renaming the newly-created directory

    Now renamed, but not saved
    Now renamed, but not saved

    Now renamed and saved
    Now renamed and saved

    Any mounts the automounter handles will be listed under this new directory in NetInfo. Let's add one.


  4. Click on mounts in the browser, and create a new directory. The value of the name property for each subdirectory in mounts specifies the remote filesystem to be mounted (in our example, nfsserver:/exported/path). Double-click new_directory in Value(s), and enter nfsserver:/exported/path. This specifies what remote filesystem to mount, but nothing else; we need to add a few more properties in this directory.


  5. Under the Directory menu is a command, New Property, which is what we will use to add the properties. Select this command three times, as we'll be specifying the local mount point, mount options, and the mount type.
    Three new properties added
    Three new properties added


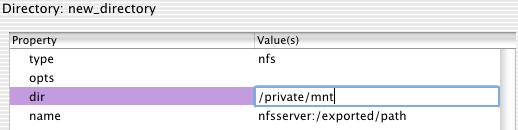
  6. Double-click the first new_property and rename it to type; set the value of this property to nfs since we're doing NFS. Change the second new_property to opts, and set the value to a blank (delete what is currently there, also see the note about opts at the end, especially if you experience problems). Change the third new_property to dir and set its value to /private/mnt.
    Properties are now set
    Properties are now set


  7. Save changes. At this point, all necessary information has been loaded into NetInfo for automount to take care of the NFS mount. The only thing left is to inform the automount process that things have changed.


This can, of course, be repeated for other NFS mounts. Run through the steps for each one, then do the final step (notifying automount) after all the mounts have been entered.

NetInfo Changes, Command Line
Adding an NFS mount point via the command line is actually quite simple, once you know the secret. It involves four simple steps, one to create the new NetInfo entry, and three to add the three new properties to that

  1. To create the new entry, run

    sudo nicl . -create /mounts/nfsserver:\\/exported\\/path

    Since NetInfo uses the / to separate path components, and we have / characters in the entry we want to create, they have to be escaped.
    This is done with the backslash, \, and since we are running in a shell, we need to double them up. After the shell is done examining the command, the string \\/ becomes \/ which is what we need to pass to nicl. If we don't use any backslashes, nicl will end up creating an entry /mounts/nfsserver: which has a subdirectory exported and that would have a subdirectory path. This is definitely not what we want.
    Basically, double-backslash the forward slashes in the NFS server's path (/exported/path), but not the NetInfo path (/mounts/).


  2. Now we need to add the three properties which tell automount about this entry. We need type which we set to nfs; opts, set to an empty string (but see the note about opts, below, if you have problems); and dir, set to the local mount point, /private/mnt. This is done:

    sudo nicl . -append /mounts/nfsserver:\\/exported\\/path type nfs
    sudo nicl . -append /mounts/nfsserver:\\/exported\\/path opts ""
    sudo nicl . -append /mounts/nfsserver:\\/exported\\/path dir /private/mnt

    The interesting thing to note is /private/mnt doesn't have any escaped forward slashes. This is due to the data being given to nicl in this case is a value, not a NetInfo path, so we needn't do any escaping this time. These commands simply append the given property to our newly-created NFS entry, and give those properties appropriate values.


  3. The last step is to notify automount that there are changes.


As with the graphical version, this can be repeated for all necessary NFS mounts you need to have on your OS X machine. Add them all, then notify automount.

Final Step: Tell automount
The automount process now needs to be told that new information is available for it to use. You can either simply reboot, or run the following in Terminal:

sudo kill -1 `cat /var/run/automount.pid`

This will send a HUP signal to the automount process; note those are backticks, not the normal single quote marks. A HUP causes automount to unmount anything not busy, reread configuration, and start anew.

A Few Notes to Know

  • Local mount point, availability
    The first thing to note is the local mount point (once automount takes it) becomes a symlink. It should point to /automount/private/mnt, as that's where automount puts all of its mount points. Then, when the symlink is accessed, automount will live up to its name by automatically mounting the proper NFS server's filesystem. This is one reason why using automount is better than a static mount in some startup script: if the NFS server is down, it won't matter until you try to access the mount; with a static mount, booting up the client will take several minutes while it times out waiting for the down server.


  • opts
    The other thing to note is, if your NFS server requires a client to be coming from a privileged network port (less than 1024), you will need to add -P to the opts property, instead of the empty string. You can also modify the server to allow 'insecure' ports, but using -P doesn't require root access to the server.
    This will be the case with certain BSD-based servers and some Linux ones as well. If the local mount point becomes a symlink (as discussed above), but doesn't have any of the files expected from the server, try adding the -P option, then tell automount. If the mount still doesn't work, there are other issues to deal with (a full NFS troubleshooting discussion is beyond the scope of this document).


  • Viewing /mounts from the command line
    If you want to look at what's currently in /mounts from the command line, run

    nidump -r /mounts .

    This will dump out the information recursively (what's in /mounts, and all the information pertaining to it). It should look something like

    {
    "name" = ( "mounts" );
    CHILDREN = (
    {
    "dir" = ( "/private/mnt" );
    "name" = ( "nfsserver:/exported/path" );
    "type" = ( "nfs" );
    "opts" = ( "" );
    }
    )
    }


Friday, September 08, 2006

All It Takes to Rescue an iBook


Is a vacation.

A few weeks after the hard drive on the 5-year old G3 iBook gave up, I plugged it in and powered it on. It works, again. Time to move data to server before something bad happens ...